
I recently purchased another set of tickets for an upcoming vacation from the website Undercover Tourist, so I thought I’d share how to buy the tickets, add them to the Disney app as well as make Park Reservations.
Ready to start your own blog? Click here to learn how.
First Time Planning? If you are planning your first ever Disney trip or first trip since the pandemic, check out my Disney trip planning tips for first time guests to see how to prepare for your visit to the Happiest Place on Earth! (Link opens in a new tab so you can continue reading the story below)
Add to your Disney collection with Amazon! – affiliate link.
So you’ve decided to purchase third party tickets to Disney, Congratulations! What do I do now? (If you bought direct from Disney, you can scroll to the add park reservation section.)

To start, click the Undercover Tourist link for the location you want to visit, Walt Disney World in Orlando Florida or Disneyland in Anaheim California.
On this page, you’ll have an option to choose the type and length of your tickets. Types include Single Park per day, park hopper, Genie Plus for either option, etc and anywhere from 2-5 or 2-10 days, depending on location. Single day options are not available. Select how many adults and children for the ticket type and length you want for your trip, then proceed to check out.
After check out, you’ll receive an order confirmation email right away. It will take several hours after the order confirmation before you receive notification the e-tickets have arrived. Click the View E-ticket button in that email.

This will open a PDF document with your ticket information and a barcoded ticket number. This next step is easier if you have the PDF open on a laptop computer and a phone with the Disney app open.
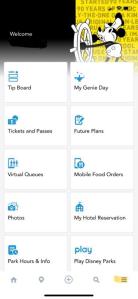
In the app, click the 3 lines in the lower right corner, the menu button, then click Tickets and Passes. Then click the + in the upper right corner (where the blue X is below), then click Link Tickets & Passes.

Your device will open the camera to allow you to scan the barcode. Hold both devices steady until the screen autofills all the information. If the device is moved away too soon, it may look like it pulled in the ticket number, but may give an error. Just rescan the code if that happens. If you only have a single device, you can click the Enter the ID number at the bottom and manually enter the number. It’s rather obnoxious as you have to go back and forth between screens to get the full number typed in.
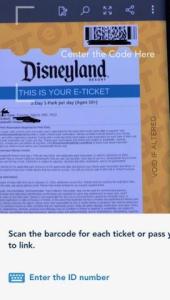
After the scan, you’ll assign the ticket to a guest in your party. It will try to assign them all to you, rather than the name on each ticket in the PDF, so make sure you update the name and save. The PDF has 1 ticket per page, so scroll down and add each additional ticket until complete. The tickets will appear in the tickets and passes section as you complete the scans.
Next, you’ll need to add Park Reservations. If you’re going to Disneyland, you must be within 120 days of your trip. Disney World has the window open through January 2024 currently, almost 2 years out.

To add the reservations, click the + at the bottom center of the app, then click Make a Park Reservation.

This will open a web browser page. Click the Make Park Reservations button. You may be directed to sign into your Disney account in the web browser if you haven’t recently signed in.

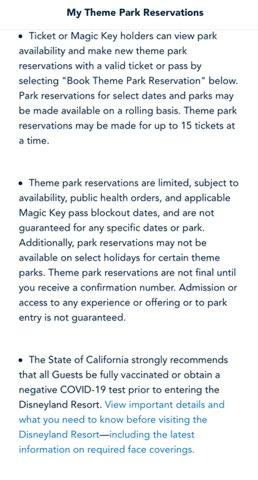

You’ll then be on the page above where you have to scroll down through the information. Click Book Theme Park Reservation.
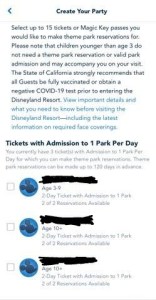
On the create party screen, select one or more tickets. Most likely you’re all going to the same park, so select all the tickets and click next.


This next screen will provide information regarding the different ticket types. Park Hopper tickets only need to select a starting park. Scroll down to the calendar and choose your park day. The above screen shot is from Disneyland. I believe Disney World, you select your park before getting to the calendar screen. This calendar for Disneyland has icons to signify park availability. Castle for Disneyland Park and Ferris Wheel for Disney California Adventure Park. Both icons mean both parks are available. A slash through the dates means the day is unavailable. In my example above, the slash just indicates more than 120 days out.

After selecting the date, scroll down the screen to select the park you’ll be starting your day at, then click continue. You’ll then be on a Review your Selections screen. Verify everything is correct, then scroll down to the bottom, check the Terms and Conditions boxes and click continue.


Next, you’ll be at the Park Confirmation screen. Verify all info is correct. If you have more park days to book, you can click the add another reservation button. Once you’ve added reservations for all your park days, you should be able to see all your reservations.
After everything is complete, you can sit back and relax, knowing you have completed the steps necessary to enter the Disney Parks!
Have any questions regarding entering the parks, feel free to ask below in the comments.
If you’re ready to start exploring a Walt Disney World or Disneyland family vacation, I recommend checking out Undercover Tourist for your ticket options. I’ve already used them twice, once at Disneyland and once at Disney World and will plan to continue comparing their prices with other sites, however I usually come back to UT because they have the best deals and their instructions make it easy to add your tickets to the Disney apps.

2 thoughts on “Buying Tickets from Undercover Tourist”