
One of the most important parts of a Disney trip is the Disney app. This app has many planning options as well as tasks to do each day of your trip. As you prepare to visit, it’s important to know how to navigate the app. This guide will inform you of each section of the app.
Ready to start your own blog? Click here to learn how.
First Time Planning? If you are planning your first ever Disney trip or first trip since the pandemic, check out my Disney trip planning tips for first time guests to see how to prepare for your visit to the Happiest Place on Earth! (Link opens in a new tab so you can continue reading the story below)
Add to your Disney collection with Amazon! – affiliate link.

Prior to your trip, you will want to download the correct app for your location from the app store of your device. Disneyland’s app is simply called Disneyland in the app stores while the Disney World app is better known as My Disney Experience. Regardless of the app, however, the functions are nearly identical.

Upon downloading and launching the app, you’ll be asked to sign in to your account. You’ll also be asked about biometric sign in, if your device allows it, allowing location services and Bluetooth, and others. Location and Bluetooth services are important for some of the features to work correctly while at the parks.
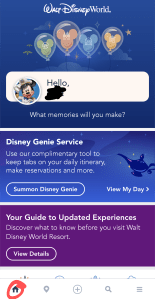
When you open the app, you’ll see the main screen welcoming you to the app. This page has a few helpful sections, like quick access to Genie, park hours for the day, and, when necessary, a link to the Virtual Queue. To get back to this main screen, click the Home icon at the bottom left of the app.
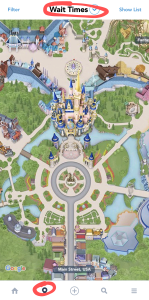
The icon next to home is the Map icon. The map allows you to see locations of all sorts of items. The default view is wait times/ride locations, but if you click Wait Times, you’ll see this menu:

Choosing one of the options will change the pins on the map based on what you selected. When in the parks, it’s also good to use the filter to only see items in your park. Show List gives a full list of the map item selected, which can make it easier to identify what you’re looking for.
The middle plus symbol is a list of action options. Some of the items are for pre trip planning while others are used while onsite.

The magnifying glass is a search option. If you know the name of something you’re trying to find, you can type it here and select the search option:


For example, typing in churro and clicking the search item will bring back a list of restaurants that offer churros.
The final icon along the bottom is the Menu icon. This is where you can find a shortcut to nearly everything you want to do. The Tip Board and My Genie Day are both part of the Genie system. Tickets and Passes is where you can see up to date info about the Tickets on your account, upgrade, or purchase tickets. Future plans let’s you see any plans you’ve made including Hotel Reservations, Park Pass Reservations, Dining reservations and more.

The Disney MagicMobile icon allows you to set up your phone to scan into the park, Lightning Lanes and more. Virtual Queues, not used right now, allow you to obtain a virtual spot in line. This has been used for new rides recently and may or may not get used again in the future for new rides. Mobile Food Orders let’s you see your current orders or make a new order.
Disney Photopass Lenses gives you Instagram styled selfies while in the park. This is included with the paid Genie+. Photos show you the pictures Disney Photopass photographers take of you while in the parks, as long as you scan your ID. Ride photos are found here as well. To keep these pictures, Disney World guests pay $200 for the length of their stay, while Disneyland guests get this included with their Genie+ purchase. Resort Hotel lets you see information about your upcoming hotel stay and provides certain features after you check in, such as unlocking your hotel room, seeing estimated next bus arrivals to your resort, and more.

Moving on to the second half of the menu, Park Hours & Info gives you another location to find park hours. Play Disney Parks takes you to a separate app filled with games and challenges to complete while at the parks that are fun while standing in lines, but a total battery suck. Shop Merchandise takes you to the Shop Disney website. Chat with us gets you to the help you need. It can sometimes be used for a quick remedy to a situation while in the park, however, if they’re busy, it may not be immediate, so it’s probably best to seek out Guest Services in the park for quick responses.
The rest of the items are pretty self explanatory. I will point out Cast Compliment. If a cast member does something to wow you, take note of their name and working location and submit a compliment. Perfect opportunity here to state Always Treat Cast Members With Respect. They deal with thousands of people everyday and try to make everyones vacation magical, but if they let you down in any way, there’s no need to treat them bad. Think of yourself or children in their shoes.
When it comes to the app, it’s fairly complex and can be intimidating if you don’t look at it until you start your trip. Take some time before you leave to explore different parts of the app, understand the map and what it offers and be able to find what you need by changing the menu items, etc. Make it useful for you as you’ll be utilizing it every day.
If you’re ready to start exploring a Walt Disney World or Disneyland family vacation, I recommend checking out Undercover Tourist for your ticket options. I’ve already used them twice, once at Disneyland and once at Disney World and will plan to continue comparing their prices with other sites, however I usually come back to UT because they have the best deals and their instructions make it easy to add your tickets to the Disney apps.

One thought on “Disney Tips: Disney Mobile App”